Customer Feedback Application Instructions Delivery Details Contact Us
4x4 Vehicles Car Decals Land Rover General Horse Parking Shop & Business Caliper Decals

If you have any questions, please do not hesitate to contact us and we will delighted to help.

Click Here to email us.

Thank You.

Surface Preparation
All surfaces must be thoroughly cleaned before the application of vinyl graphics. Follow the instructions below for specific cleaning procedures:

Interior Painted Surfaces
Clean with any multipurpose household cleaner such as Mr Muscle / Fantastik or Formula 409. Wipe area clean and dry with a lint free cloth before applying vinyl graphics. Freshly painted surfaces should dry for at least 72 hours before applying vinyl graphics.

Plastics & Glass
Thoroughly wipe the application surface clean with rubbing alcohol. Remove any material such as tape or glue with a razor blade. 

Painted Metals and Base Metals
These surfaces may be cleaned with rubbing alcohol, xylol, naphtha, or lacquer thinner (test an inconspicuous painted area with the solvent you use to insure compatibility with the paint). Dry the surface with a lint free cloth before the solvent evaporates. Freshly painted surfaces should dry for at least 72 hours before applying vinyl graphics.

Temperature & Weather Conditions
For best results the room temperature and temperature of the target surface should be between 45 and 90 degrees F.  Do not apply on misty or rainy days. Very high humidity may effect the application process. Avoid installing graphics in direct sunlight due to rapid surface temperature changes. Do the application in a wind-free area. Wind gusts will cause problems especially after the liner is removed and the vinyl adhesive is exposed!
Instructions for Graphics Application
READ ALL INSTRUCTIONS before application. For information on Larger Graphics see paragraph after Step 5 below. For multi-sticker sheets (eg stars, flowers, shapes etc cut out individual stickers from the sheet using a scissors.

If you have no experience with vinyl graphics and feel unsure about applying them, you may want to seek help from a local professional shop.


Tools & Materials Needed:
1. Scaple knife or razor blade. (to separate segments of the graphic if necessary).
2. Plastic Squeegee (the edge of a credit card will work just as well).
3. Roll of Masking Tape (2 inch preferable).


Step 1:
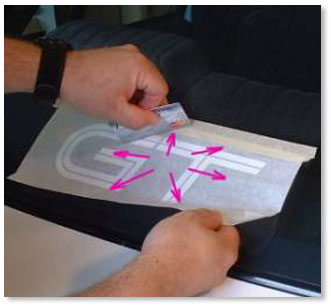
First, lay the graphic face down on a flat surface. Using a squeegee, credit card, or similar item, firmly rub graphic area starting from the center and moving outward. This will insure that the graphic is adhered to the pre-mask.

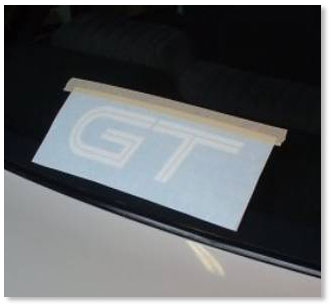
For small & medium graphics, apply a single horizontal strip of 1"- 2" masking tape to the top of the graphic. The centerline of the tape strip should lie on the edge of the graphic (half the width on each side as shown). The strip will serve as a hinge to insure that the graphic does not move during the application process.


Step 2:
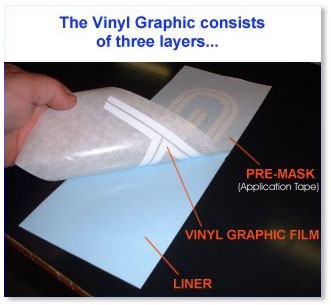
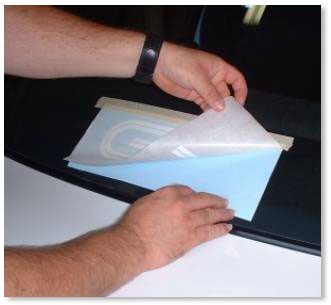
Hold the bottom edge of the hinged graphic away from the target mounting surface and remove the liner to expose the sticky face of the vinyl.

CAUTION! Do not let the exposed graphic TOUCH the target surface. The graphic face is very tacky and will tightly stick to the surface. If the placement is not correct, removing the graphic for repositioning will be very difficult (and maybe impossible) without causing damage to the vinyl.


Step 3:
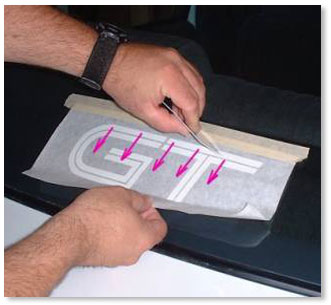
Continue holding the hinged graphic away from the target surface. Using the squeegee, begin the graphic application at the top edge and work toward the bottom. Smooth the graphic down on the target surface with a sweeping motion.

AGAIN  - Work from the top to the bottom. Do not let the entire graphic drop onto the target surface. If creases or wrinkles develop, carefully lift and reposition the graphic.


Step 4:
When the graphic is in the correct position and lying perfectly flat, firmly press the graphic down with the squeegee (starting at the center and sweeping outward) to insure that all elements of the graphic adhere to the  target surface.


Step 5:
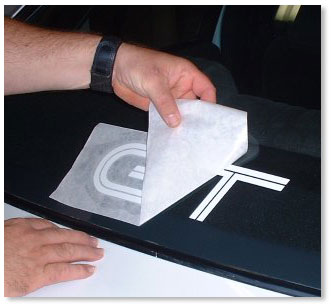
Gently remove the pre-mask. Pull back at a sharp angle to help avoid lifting the graphic along with the pre-mask.

Large graphics are best applied with help from another person to hold vinyl (at the corners of the pre-mask) up off from glass ahead of the squeegee.

For larger (over 400mm) or longer graphics the "WET" method may be necessary (it's more forgiving when repositioning is necessary). Using a spray bottle (filled with a mix of 1 litre of water and 2 drops of washing-up liquid) lightly spray area under graphic JUST before application with squeegee. For long window banners or long strip type sections; AFTER applying the tape "hinge" split entire graphic in half or into thirds between letters and apply one section at a time working downward from hinge. For long "visor" type banners; position banner and secure with masking tape on bottom edge, trim top of graphic to fit glass. Secure top edge with tape at only one end (from center outward) remove the liner (and any bottom edge tape) at other half and apply the graphic with a squeegee from the center outward (rather than top down as with hinge method). Now remove all tape and liner on other half and apply in same manner, from center outward. Trim ends of visor graphic to fit glass. 

Vehicle Side Graphics may require cutting around side trim, door handles, shadow lines etc. Cut vinyl back about 1/8" to 1/4" from these features with X-acto knife or razor blade (be careful not to cut into paint).


Step 6:
Trouble with Bubbles
Problems with large air bubbles are more likely with large vinyl applications. If its not possible to work them to the edge of the vinyl, they can be removed by piercing the vinyl carefully with a pin and then working out the bubble. The pinhole will be unnoticeable after.

For both small and large vinyl applications it is not unusual to have some minor air bubbles. Trying to work these out can do more harm than good. These normally disappear after a week or two once the vinyl ‘breaths’ by going through several temperature changes.

Step 7:
Removal Instructions
There may come a time when you need to remove your vinyl graphics / stickers.

Using a hair-dryer (or heat gun with care), gently heat up small areas of your text or sign. Then carefully use a picking tool start at one corner and begin lifting the vinyl off.

Once a large enough area for you to grab with your fingers is lifted, pull the letter or portion of the vinyl area and peel off. Take your time and when the letter or vinyl becomes difficult to remove, stop and re-heat the area again.

If any adhesive residue is left on the surface simply use rubbing alcohol or similar to wipe away the residue easily.

 
4x4 Vehicle Stickers
Car Decals & Stickers
Land Rovers Stickers
General Signs & Stickers
Horse Signs & Stickers
Parking Signs
Shop & Business Signs
Caliper Decals